One of the initial mistakes beginners make is buying an expensive new putter without knowing their putting stroke. You must determine if you need a face balanced putter (straight back and through putting stroke), mid-hang putter (slight arcing putting stroke), or toe down putter (strong arcing putting stroke). Then choose a putter of the correct putter height that best fits your game.
You can identify your putting stroke by putting two tee pegs in the ground roughly four feet apart. By using a golf alignment stick or tying a piece of string between them, line up with your putter underneath this line. Make practice strokes to see whether your putting stroke is straight back and through, a slight arc or a strong arc.
Putting is the most personal of the golf strokes. The way you hold your putter affects the quality of your putt from setup to stroke. Try different styles of holding the putter and see which grip feels the most natural and comfortable to you. Your grip needs to keep the putter on the path with the face straight on impact. This ensures that the golf ball starts rolling on the correct line to the hole. The most common grip on tour is the conventional Reverse Overlap Putting Grip, also used by Tiger Woods. Since it is a slight variation of the same grip that you use for your full swing; it provides a consistent feel from full golf shots through putts. Other common grips include the Cross-Handed Putting Grip (Reverse Grip), The Claw Putting Grip, Prayer Putting Grip (Palm to Palm), Arm-Lock Putting Grip, and Split Handed Grip.
Position yourself with your eyes in the same vertical plane as the ball. Make sure that the golf ball lines up with your lead eye (left eye for righties, right eye for lefties). To test your position, drop a second golf ball straight down from your lead eye. If it touches the ball on ground, you know you are positioning your eyes correctly. Instead of positioning your eyes straight over the ball, set them a couple of inches to the inside of the golf ball. Experiment and learn what works best for you. It is essential that your eyes don’t follow your putter back on the backstroke and the path of your ball in the forward stroke.
Your feet should be shoulder width (or wider if you need further stability) with a strong posture that gives you control throughout the putting stroke. Bend your elbows and rest them slightly against each side of your rib cage. The forearms should be in line and parallel with your target putting line. Your hands should be on the same vertical plane as your shoulders or a just outside the shoulder line (toward the ball). Imagine the putter as an extension of your forearms. Think of your arms as the shaft of your putter and the palm of your bottom hand as your putter face. In this setup, the putter shaft should remain perfectly straight through your backswing and follow-through.
Practicing Drill 3: Putting Alignment by Squaring the Putter Face to the Ball
Objective: To improve putting accuracy by adjusting your putting grip to ensure that putter face is square to the ball.
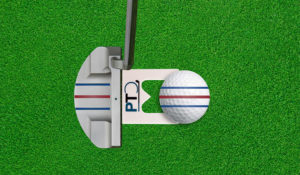
Buy the Precision Golf Ball Marker and/or Putting Trainer to get this drill and many others free – click here.
When you swing your putter, it rises on the backstroke and then in the forward stroke. Your putter will be closest to the ground at the bottom of its arc. To have a neutral setup, your weight should be evenly distributed between your feet. The lowest part of the arc should be in the center of your stance. Also, grip the putter in a neutral position since the putter face of most putters have loft of about 2-4 degrees. This loft is built into the club to help you with your swing. The direction and distance of your putt are compromised when the approach of your putter into the ball is too steep or too shallow.
Practicing Drill 4: Avoid “grass lag” when Putting
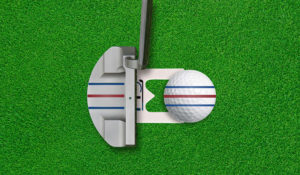
NOTE: Many golfers experience “grass lag” when the putter drags the putting surface on either their back or forward swing. By learning to raise the putter 1/8″ off the putting surface, golfers can avoid missed putts caused by “grass lag”.
Buy the Precision Golf Ball Marker and/or Putting Trainer to get this drill and many others free – click here.
When you rotate your head, the position of your body shifts, and you ruin your careful putting setup. It is also critical that your eyes do not follow your putter back on the backstroke and the path of your ball in the forward stroke. If your eyes move, your head tends to move and so does your body. To help keeping your head steady, keep your eyes steady. Rotating your head and/or shifting eyes result in less control over your putting swing and are detrimental to your putting accuracy. To avoid this, have another point to focus on. The focal point can be an inch or two behind or in front of the ball on the target line. Some golfers focus on the hole others keep their eyes closed when putting. The bottom line is to keep your head and eyes still.
Your putting movement should mainly come from rocking your shoulders, while the other parts of your body are mostly still. Your ability to generate an even pendulum motion on your swing will determine the quality and consistency of your putting stroke. The goal is that the putter head moves the same distance and follows the same degree of arc backward and forward. Levelling your shoulders helps you accomplish this. For short putts it is best to rock your shoulders with no wrist action. To get the feel of this stroke, place a golf alignment rod/stick between your chest and arms and perform some practice putts.
The distance of your putt determines your stroke length. The stroke length is the distance the putter head travels both back from the ball and forward towards the target. Ideally, the tempo of your putting stroke needs to be slow, avoiding any large variation in speed. It is the stroke length of your swing that builds up speed through a very gradual acceleration until striking the ball. For shorter putts, you have a shorter back stroke. For longer putts, lengthen the back stroke. It is important to have similar length follow through.
At the end of follow through when putting, hold your position and check your alignment. When using the straight back and through putting stroke, the putting face should be pointing towards the target line. If that is not the case, you need to review your putting technique and correct your putting stroke
Many golfers make the mistake to try to “hit” the ball when putting. After finishing your backswing, let the putter use gravity to fall into the back of the ball. The putter head should move smoothly through impact and the ball should roll off the face of the putter head. Correct your putting stroke if you notice that the ball tends to jump off the putter face rather than starting to roll out quickly. The key to distance control is to roll the ball, not hit it. Think roll not hit!
Never putt without first having a couple of rehearsal strokes. The purpose of rehearsal strokes is to help you visualize and get a sense of the putt. Carry out your rehearsal strokes from behind the ball while looking at the hole. Set up to the ball and make the same putting stroke you rehearsed. Rehearsal strokes also help to calm your nerves and reduces pressure. But your pre-putt routine should be short to prevent doubt from creeping in, and the fading of your picture of the putting path.
Green reading begins when you are walking up to the green. You will get a better idea of the general direction of slopes from afar. Look for the lowest spot on the surface of the green, since the ball will most likely roll in that direction. Start by looking at the hole from the low side, which gives you a good idea of speed and where the apex is. Then read your putt in sections, e.g., divide nine-foot putt into three sections. Start in the section closest to the hole, then work your way back. Pick a spot that you want your ball to roll over in each section. The middle part of the putt is the most important since you can expect most of the break there. This will undoubtedly help you to visualize your putt. Then try hitting your spot in every section when you putt. Use our Precision Golf Ball Marker and Putting Trainer to gain a wider view of your putting path. Also, use our Practicing Drill 5 to practice putting aiming and distance control.
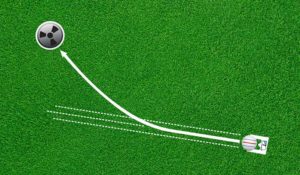
Practicing Drill 5: Practice Putting Aiming and Distance Control
Objective: To improve green reading skills and putting accuracy on more challenging medium to long putts of 12 feet or more.
Buy the Precision Golf Ball Marker and/or Putting Trainer to get this drill and many others free – click here.
As a beginner or casual player, you should practice your putting often otherwise, you will not improve your putting performance. Our Precision Golf Ball Marker and Putting Trainer are indispensable when you are practicing putting. Furthermore, our putting drills will without a doubt help you master the perfect putting stroke. The putting drills covers:
• Practicing putting alignment by squaring the putter face to the ball.
• Practicing putting to avoid “grass lag”.
• Practicing putting aiming and distance control.
• Create imaginary holes to represent holes with different putting conditions.
• And more.
Read about it – click here.
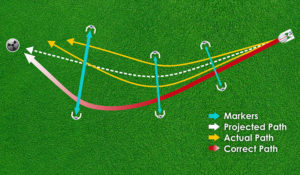
Playing Drill 3: Improve Putting Accuracy Using 3 Reference Points Alignment Method (Marker/Trainer)
Objective: To allow you to get better understanding of your putting path by gaining a wider view (compared to a single line) of the putting path utilizing 3 reference points method.
Buy the Precision Golf Ball Marker and/or Putting Trainer to get this drill and many others free – click here.
Test your putting technique and improve your sense of the green conditions and putting distance by closing your eyes while putting. Start with practicing short putts and make them with your eyes open. Then, close your eyes and see if you can make the putt. Keep on practicing the short putts until you sink the putt several times with your eyes closed. Then increase the putting distance gradually and repeat the putting drill. Mastering this will help to avoid the detrimental putting flaw of moving your eyes or head.